Aaaand I’m back! It’s been a couple of really nice weeks, as predicted, but it’s time to jump straight back into work, so let’s start off with one of our most recent design meetings, involving the next floor of the final dungeon – the Temple of Seasons!

This floor remains pretty similar to its original shape, but we’ve spent some time fleshing out the puzzle part of it. As a reminder, the idea with the temple of seasons floor was that you’d enter a lobby room of sort in which there are three doors, but only one is accessible from the start. Upon entering this door, you’ll enter a mixed season battle room, after which you’ll free Summer. With Summer along with you in the lobby, he can change the season so another of the doors open, behind which is a season change puzzle and a captured Autumn – upon releasing her she’ll change the lobby room to autumn and as such open up the door to the next floor of the final dungeon.

But what about the puzzle then? We decided to each make at least one design for it each, and then either use of our designs straight up, combine a few, och edit someone’s idea until it felt just right.

Some of Freds designs above!

My design is a pretty straight forward puzzle in which you have to reach a key on a platform by using an unstoppable (?) moving block in the water, some floating wood, a plant, and the power of the seasons! For now it seems we’ll use some variation of this idea. Let’s see if you can figure it out in the game! :)

Next up, we have some more of those archery backgrounds! Let’s have a look:

And coming right up, the last bunch as well:

As we’ve mentioned before, completing Arcade Mode will grant you a chest with some fancy stuff! But since this is technically the final reward of the game and pretty difficult to get, we wanted to make a proper, more epic type of chest for it!

Let’s have a go:

Meanwhile in Fred’s animation department, we have more grindea animations, a strange portal, and another fish! Enjoy :D


So, with the final dungeon drawing ever closer and closer, we’ve been sitting down and going through a whole bunch of the floor designs we made a couple months back. As you know from before, this has lead to a couple of very basic sketches for the first couple floors, which I’m about to define even more in the coming weeks.

But we’ve also been going through the dungeon as a whole, or at least the first half of it or so, and we’ve come to a design decision I think will make this dungeon better than our original idea. In our old plans, we had a lot of “filler” rooms with various smaller challenges that were only partly designed. Now, our focus will be on slimming down the floors and mainly keeping the main challenges, such as the boss fights. The reason for this is that we feel it’s likely that the final dungeon will feel strong enough without a lot of filler content, and that the ones that weren’t there for story or pacing reasons, or are simple not designed enough, could be added afterwards if we feel we need more rooms. This way we can focus on the strong parts, and easily add more stuff later on, instead of starting out with a lot of rooms that fill no real purpose and may end up getting cut anyway.

As such, the flying fortress floor for instance will go from having one dodging challenge, a phase shift challenge and a boss fight with two phase men and gun-d4m, to now only having the fight with two phasemen and gun-d4m. This might seem like a downgrade to some, but given the fact that each area is represented with its own floor, we do think that this dungeon will feel long enough anyway! And keep in mind that if we feel more rooms are needed, we can always add them back in when the rest is done.

After making these changes we already feel like the dungeon feels stronger as a whole design wise. Of course, we’re also making an effort to keep in the things that give the game personality, such as the cameos from characters you’ve met throughout the game.

With this in mind, we’re now more excited than ever to continue designing this final part of Story Mode, which will tie it all together :)

This week we continue doing some archery challenge backgrounds as well! Let’s have a look at three more floors:

And here we have the last bunch:

Next up we have backgrounds for the archery challenges as well! These backgrounds are a lot of fun and a bit weird to make since I need to mimic a child’s style of painting to the best of my ability..:

In Fred’s department, he’s been busy making a ton of archery targets! Have a look at these:

Whew! That’s a lot of archery related stuff!

Now, thanks to finally being vaccinated and not having had much proper time off this 1½ year or so that we’ve been dealing with the pandemic, I’m gonna go ahead and treat myself to two weeks off to enjoy life for a little bit! The blog will be back up and running on the 16th of August after I’ve been back at the office for a full week, so stay tuned for more stuff then :)

Until then, have a nice couple weeks, I will for sure!

Another interface that’s been around for ages without any updates is the good old quest tracker interface! Let’s see what we can do with that:

Next up we have the very basic sketch for the second floor of the final dungeon! This isn’t quite as exciting as the previous one, as it’s mostly pretty open rooms in which you’ll battle bosses – so there’s not much room to make them too complex.

Here’s the basic layout first of all:

So, you’ll start in the room called Z in the above sketch, which will be a basic one way Pumpkin Wood floor which you’ll just pass through:

Upon exiting the room above, there will be the Pumpkin Woods curse effect, and you’ll find yourself in the room below:

This room has four statues, each depicting one of the enemies found in pumpkin woods (except the Halloweed). Now, exiting the room in any direction (including the one you just came from) will lead you to a different room in which you’ll battle a special version of the enemies in the statues. So for example, exiting to the south now will bring you to a map that looks pretty much like this (but with actual graphics):

A battle will take place, say with a special version Jack o’ Lantern. Exiting the floor to the north now will bring you back the way you came, while exiting south won’t get you to a new room, but will have you back at the room with the statues, but from above.

Once you’ve went into the exits leading in each direction, with rooms that will look something like this:

..you’ll end up with each of the statues in the main lobby room lit. Once the final statue’s candles has been lit, battle with Terrorweed will commence in the lobby room, after which you’ll be able to proceed to the next floor by going north! :)

Now, time to make some archery challenge decoration stuff! Starting off with some props for each area, we’ll begin with Pillar Mountains:

The next two areas we’ll look into are Pumpkin Woods and Flying Fortress:

More Archery challenges? We got you covered!

In these two new types of challenges, you’ll need to hit an enemy with multiple shots (annoying halloweed!), or eliminate an enemy target before it hits an innocent bystander!

Over on the very small super early betas, the next update is already up and running now, featuring the new books! One thing we decided to add is proper book fronts, which look something like this:

Sample of the actual text in the game:

And here we have some of the text with some of the color variations:

We’ll be adding more book covers as well! By the time the game is finished, I would like to have more variations, but for now the main difference will be the color:

Next, we’ll be upgrading the look of the map interface, seeing as we’ve been adding a bunch of new maps recently! Let’s take a look:

This is a bit more streamlined, and allows you to see more maps on each page!

We’re also adding a different way of showing the maps, namely a pop out function which shows you the map on a piece of paper! This is what it’ll look like:

Give it more of a map-y feel, doesn’t it? :)

Now it’s time to upgrade another interface! Let’s take a look at the good old quest part of the journal and see how we can improve it:

With this new setup, active and completed quests only need one menu, and whether a quest is active or finished will depend on whether they’re gold or silver colored, just like in the Trophy section! I also upgraded each of the quest indicator images while I was at it. What do you guys think? :)

In Fred’s (and Teddy’s) department, we’re playing around with some light effects for that Grindea sprite! Below you can see some tests, as well as a palette swap – it won’t be used the way it looks there, but it shows how we pretty easily can swap her colours around if we need to during the fight, for effect purposes :)

On to the next mission, making drop appearances for each of the potted plants! First batch here:


And here’s the second batch:


And now it’s time to take a look at the new interface where you’ll be able to choose which of your seeds to plant! Going for a pretty minimalistic and streamlined design here, this interface will only show the seed, how much it costs to pot it, what sort of pot and plant it’ll result in and how much money you have!

I made two versions of this interface, one with static colours which you can see above, and one where the colours are different for each seed, seen here below:

And here’s the rest of the colours, in case we decide to go for the second version:

Which one do you prefer?

Next we have another portrait, of another of the veteran collectors we’re adding:


As for Fred, he’s been busy potting a lot of plants! Here you can see a whole bunch of them in their housing forms, including a jumpkin for which I haven’t made a proper pot yet:

Now, as I mentioned last week we’re doing a bit of an archery challenge in Arcade Mode, and as such I was tasked with making a mobile version of the archery challenge!

For now, this style will appear on each of the floors, but I have a crazy idea of making a special background and use different bush cutouts for each floor, if I manage to find the spare time for it!

Next up, some additions and changes to the transmutation GUI! For starters, the mechanic needed a proper ‘shop title’ splash, and a button for activating the transmutation service to begin with, as seen below:

We also decided to make a few changes to the UI itself, adding a couple of maracas, removing the title bar (it seemed unnecessary), and changing the colours of the gems in the interface to better represent the rest of the UI colours here.

And now, some mixed stuff, starting with some improvements on the readability of the shop title splash I just showed:

An open door in the HQ leading into said transmutation room:

And some of our progress on a different part of the game, namely the Bishop’s battle! Here you can see some more of our iteration process, ranging from climbing the pillar itself to how the encounter with Bishop himself evolved from the placeholder version to what’s currently in the game! If you look closely, you’ll see that the background has changed slightly from the previous finished version I showed some time back: we’ve moved the bushes slightly out of the way to make sure they don’t distract from the battle:


Next, back to story mode, as we’ve been working on a redesign for the trophies menu! As mentioned before, we’re gonna change the trophies themselves around a bit as well, and in doing so we’ll upgrade the whole look of this part of the menu to better match the other newer menus, basically by adding more and better graphics:

Finally we’re looking at a bunch of effects he’s been working on for the card cave, shown here as videos!

The first video shows our very first iteration of how the cavities in the wall light up depending on how many cards you’ve collected. The second video show what happens once you’ve collected all of the cards, revealing a secret catalyst, and in the third video we have adjusted the colour of the flames and added some bonus effects to when the cards merge together into the catalyst:

We’ve long been talking about revamping the challenges a bit, removing the long and slow paced ones and adding more quick and quirky challenges that you complete quickly, all with the intention of making them feel a bit more action packed. Now that we’re nearing completion of the upcoming story mode patch, it’s time to take a look at Arcade Mode, including these new challenge types!

To start off with, there will be two types of challenge rooms now – one where you’ll just solve strange challenges without risking any damage, and one for all the more dangerous challenges where you might accidentally take a hit – such as the kill in order challenge already implemented. Other ideas for these types of challenges include mini boss battles, kill quickly challenges, or take no damage challenges. Of course, due to the more dangerous nature of these challenges, it’ll be properly marked on the map so you know you’re risking your health if you enter – and also the reward will obviously be greater than in the ordinary challenge rooms!

For the regular challenge rooms meanwhile, we’re probably removing the bigger chicken challenges as well as fishing (but don’t quote me on that just yet). Some new ideas we have include:

An archery challenge, where you’ll spawn into a “fake”/prop version of Robin’s archery challenge from story mode, and you’ll have to hit enough targets or get a minimum amount of points.

A music challenge where you’ll have to mimic the order in which the musical faes from story mode play a song on a set of bells of your own.

And an animal taming challenge, where you’ll have to successfully tame a pet to get the reward!

…and we’re currently in the process of designing more! Do you have any cool challenge ideas you’d like to see in Arcade Mode? Let us know in the comments :)

Now, back to story mode for a little bit, as I make a bunch of adjustments to the Card Room in Mount Bloom, moving things around a bit and making more subtle frames for each of the cards:

In the end, we opted for an even more subtle frame (but don’t worry, it should look fancy enough once you’ve found some cards):

Now, back to Arcade Mode and its floating isle final room! In this next part I make a proper stand for the chest you’ll get for reaching this far:

And finally, the other floating isles in the distance:

Meanwhile, Fred’s been hard at work finishing up all of the animation sketches for Bishop and a couple new ones (including the one below where he brushes off some dust after you’ve successfully defeated him):

He’s also been working on a bunch of light effects for the Mount Bloom card room which we hope to show you within the upcoming couple weeks! Stay tuned for that… :)

New week, new improvements! We wanted to make the Bishop boss portrait look a bit more creepy, so I did a bit of an paintover to adjust just that:

We’ve also made some additions around the card room, adding frames for each card to the wall, as well a a proper entrance (bye bye dragon floor and puzzle stuff):

With us finally deciding the visuals for the floating isle that will be the final Arcade Mode room, it was high time to add that and Arcadia itself to the world map (proper layout of the isles yet to be decided):

And speaking of the floating isle in question, I’ve started working on that as well! Here’s as far as I’ve gotten as of yet, more work to come:

Finally, Fred makes some progress with cleaning up the Bishop’s animations (have a little sneak peek), as well as adding some light effects to the cards in the card cave, which will illustrate how many cards you’ve collected thus far:

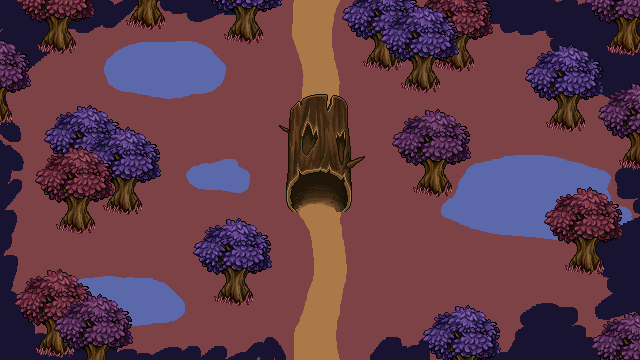
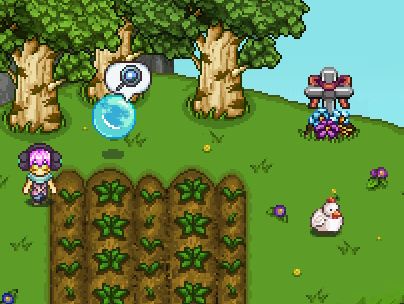
This week we’ve been talking about the fifth floor on your journey to the top of the tower! This floor will be all about the Temple of Seasons, and will begin in a wintery area in the woods, where you’ll walk through a corridor of trees that part and walk off to the sides to reveal a path before you, all while fae dart back and forth (just to set the tone a bit). This path will eventually lead you to the Temple of Seasons entrance, where the actual floor will begin.

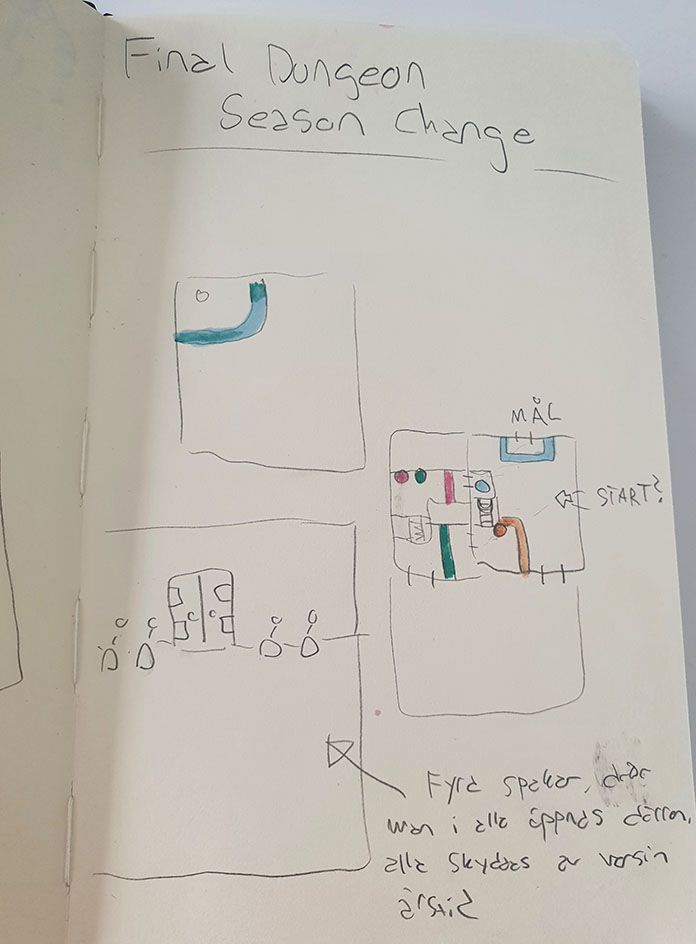
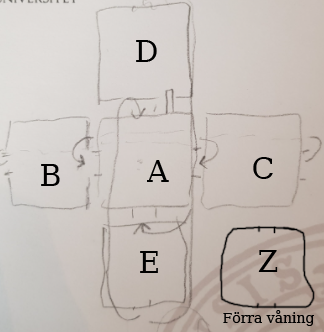
You’ll enter a Temple of Seasons room that’s currently winter, but thankfully, Naniva appears and helps you by turning the room into spring, allowing you to enter one of three doors. This door leads to a fight or puzzle room yet to be decided, where you end up rescuing Autumn. Once you return to the first room, she will then turn it into autumn, revealing a second door leading to another fight/puzzle room where your goal is to rescue Summer. If you succeed in this and return to the first room he will turn the room into its summer version, allowing you to pass through the final door.

In this final room, you’ll battle an enraged version of the Hydra, summoned by the mirror guardian of the tower. This version of the Hydra has one more head, representing spring, thus you’ll have to battle the four seasons all at once! We haven’t decided exactly what the spring head will do yet, but one suggestion is that it’ll cause loads of bushes to grow in the area, serving either as an obstacle for you or something that will deal damage as well (by the addition of thorns). Another suggestion for a super move the hydra can make here is to turn the room into all seasons at once, using all of their powers for a short while… >:)

As for the puzzle/battle rooms, we haven’t made any fixed plans, but we’re playing around with the idea of having a special enemy in the shape of a rainbow orb, that will appear and turn the room into all seasons – only once you defeat the orb it’ll go back to normal, so until you do the rest of the enemies will be in their elite versions. We don’t want these rooms to be too complex, seeing as there’s still a ton of rooms to go through, but I think so far we have a good balance. Let’s see where the next floors take us :)

In Arcade Mode, we need a room you’ll get to once you finish the Ghost Ship, where you’ll get some sort of reward – and, if you’re powerful enough, you’ll get the chance to transcend into one final floor where an epic final boss battle awaits!

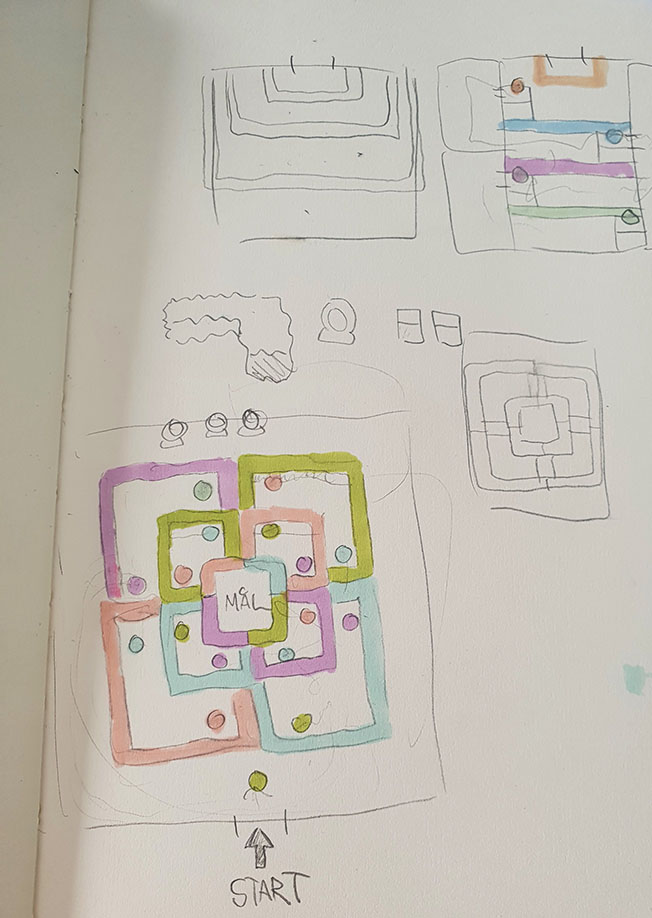
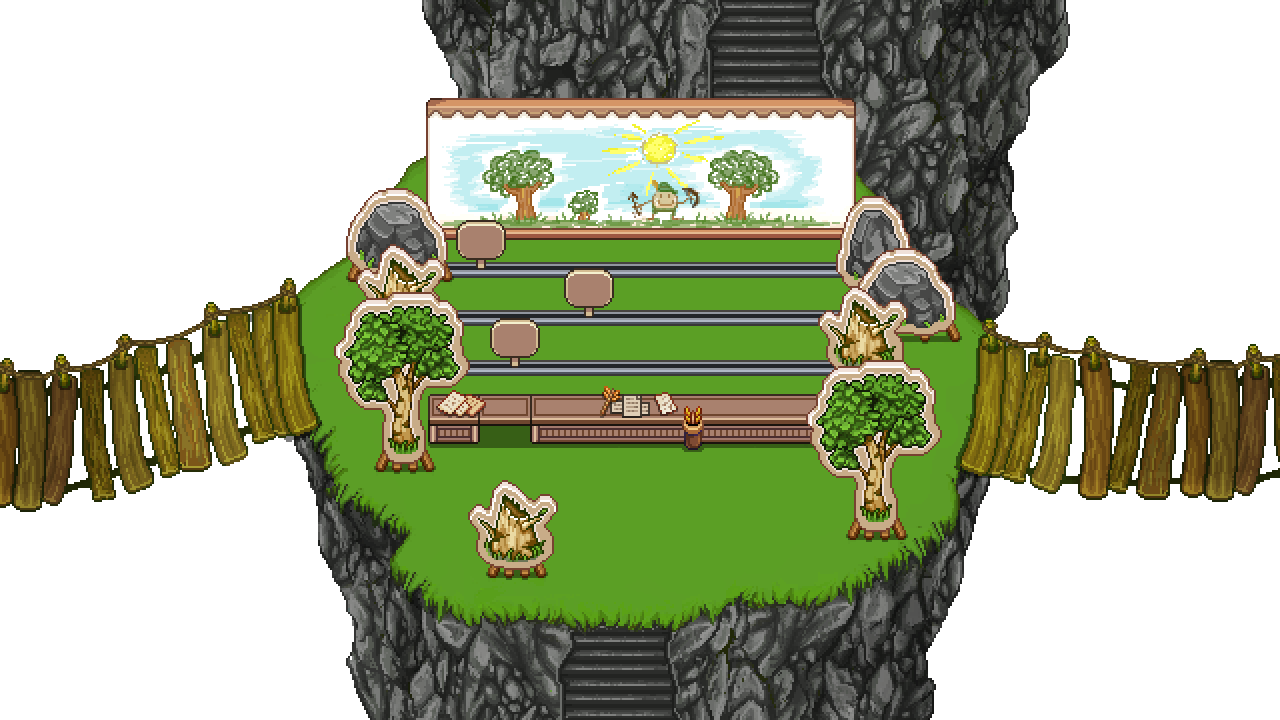
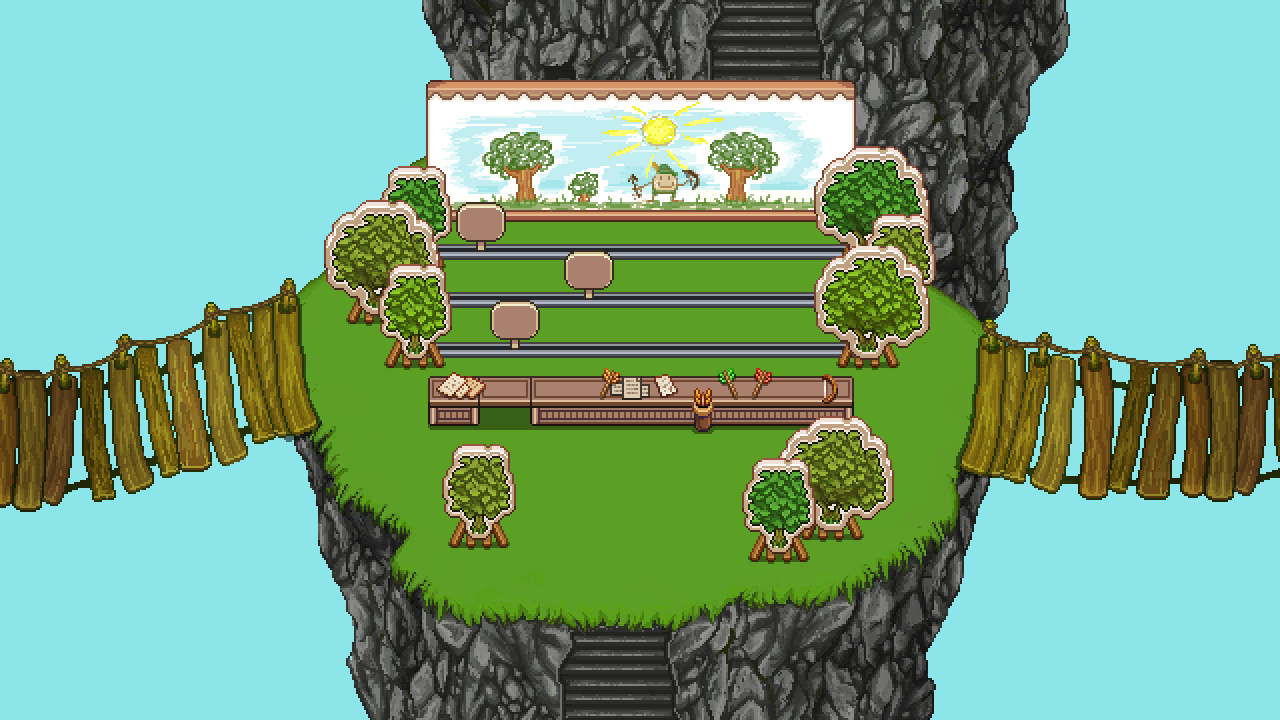
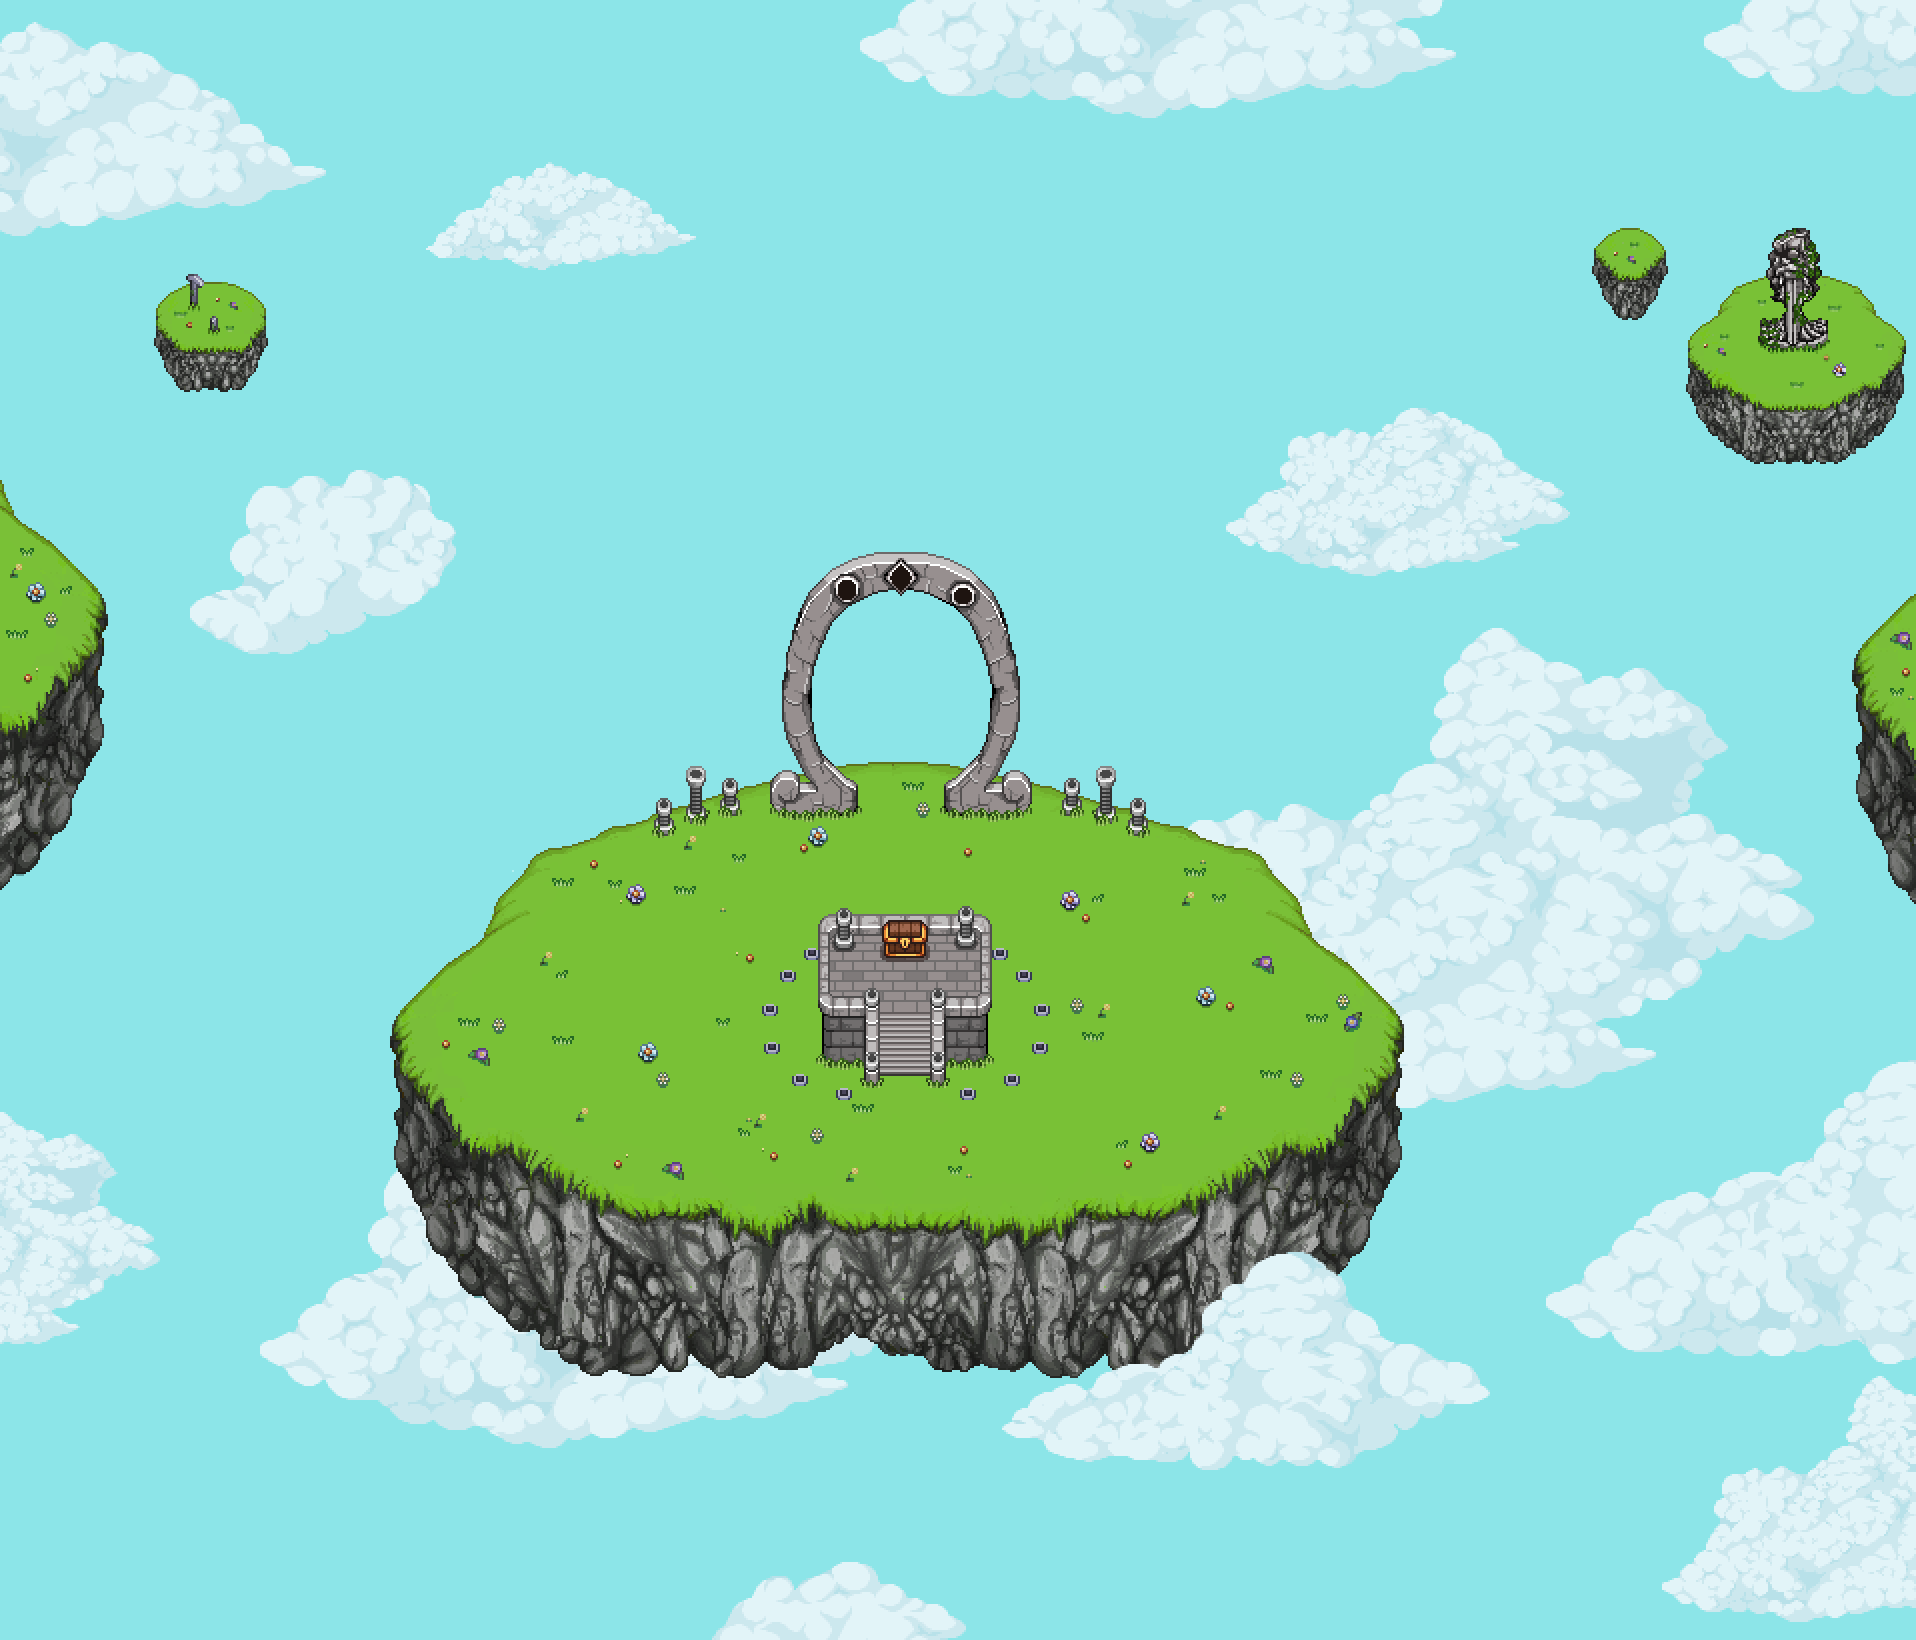
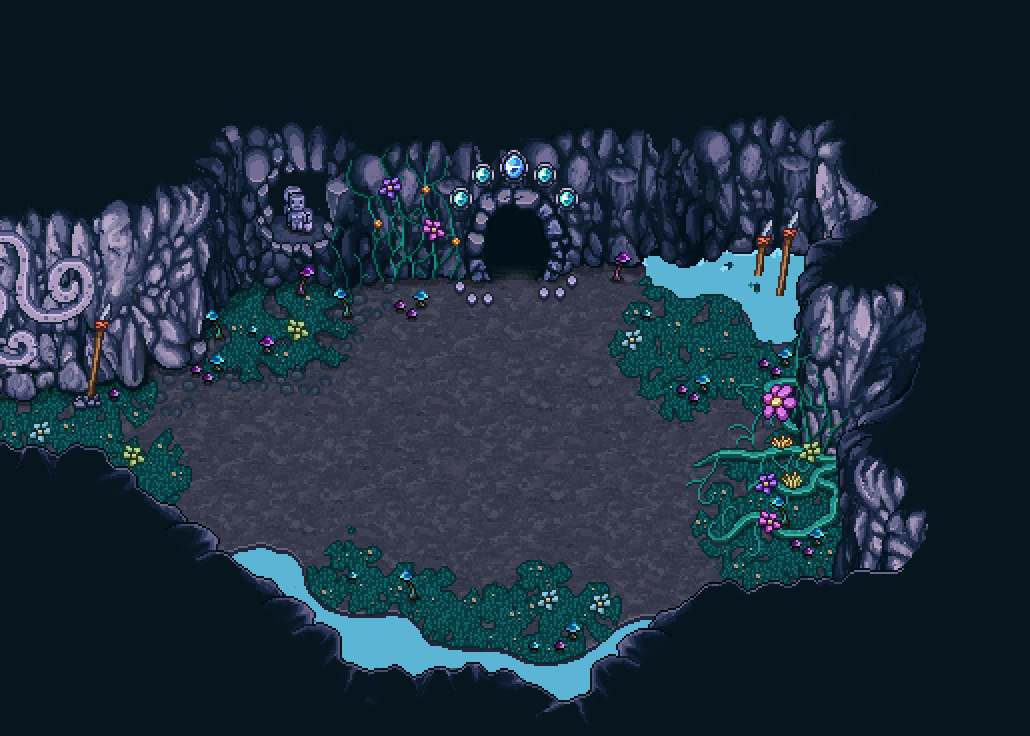
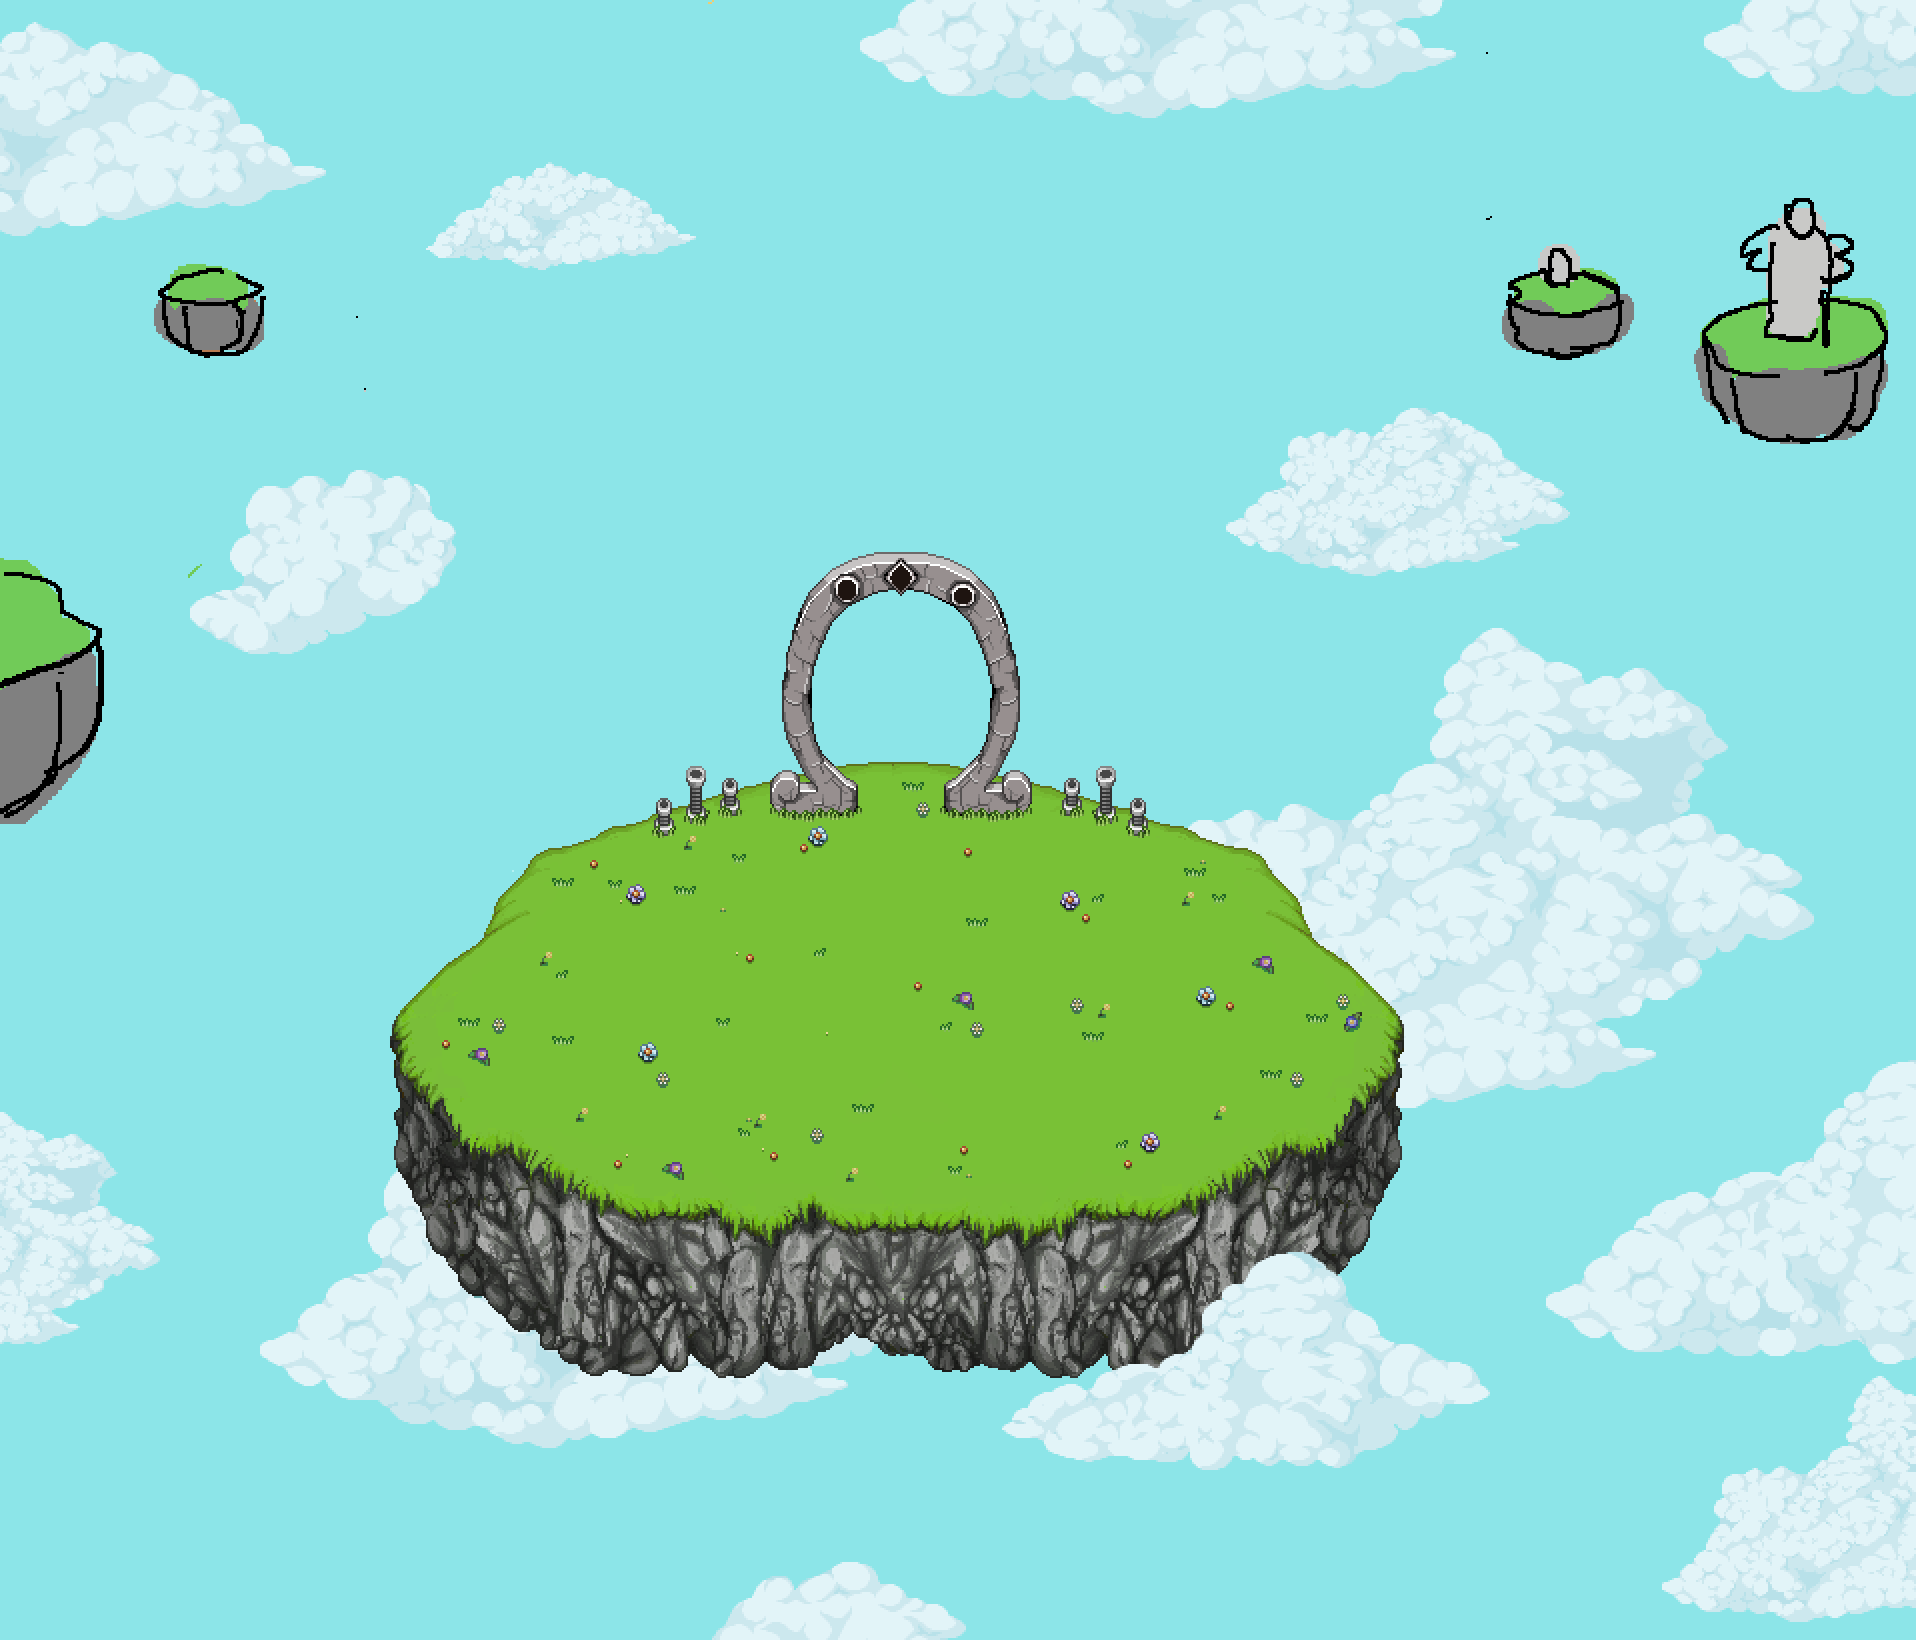
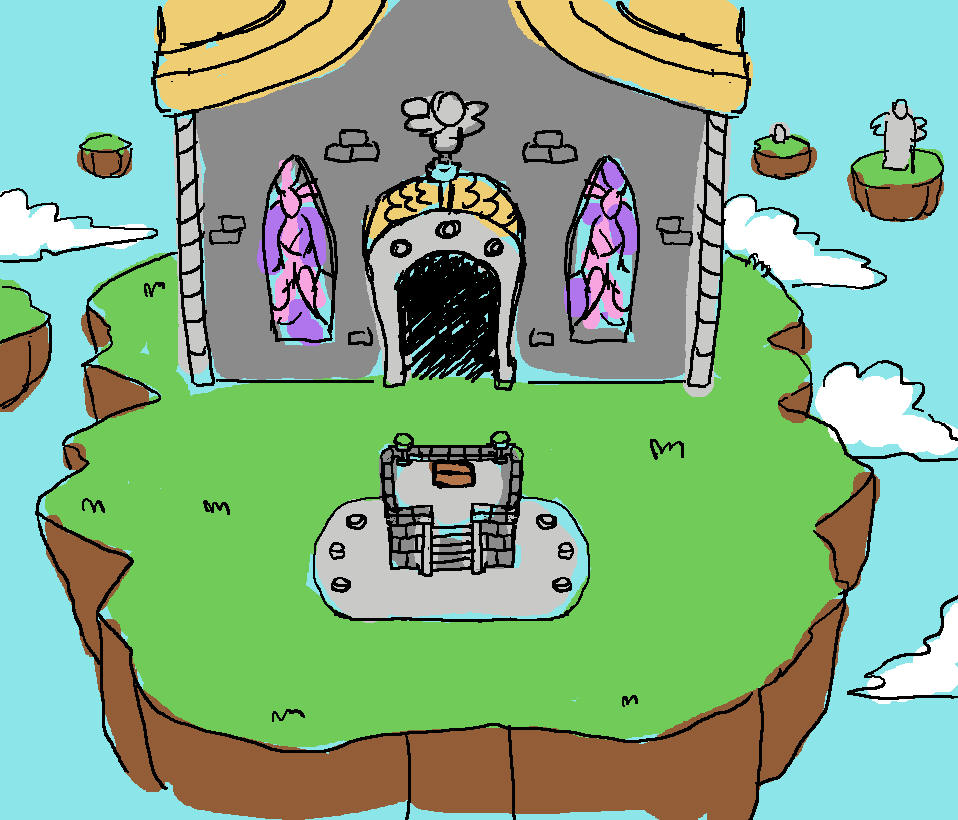
So, I’ve been making a couple of suggestions for what this room could look like, and this first one is inspired by what I’d like the final floor to look like – otherworldly, up in the sky, on floating isles with other floating isles in the distance having statues or parts of statues of Grindea on them:

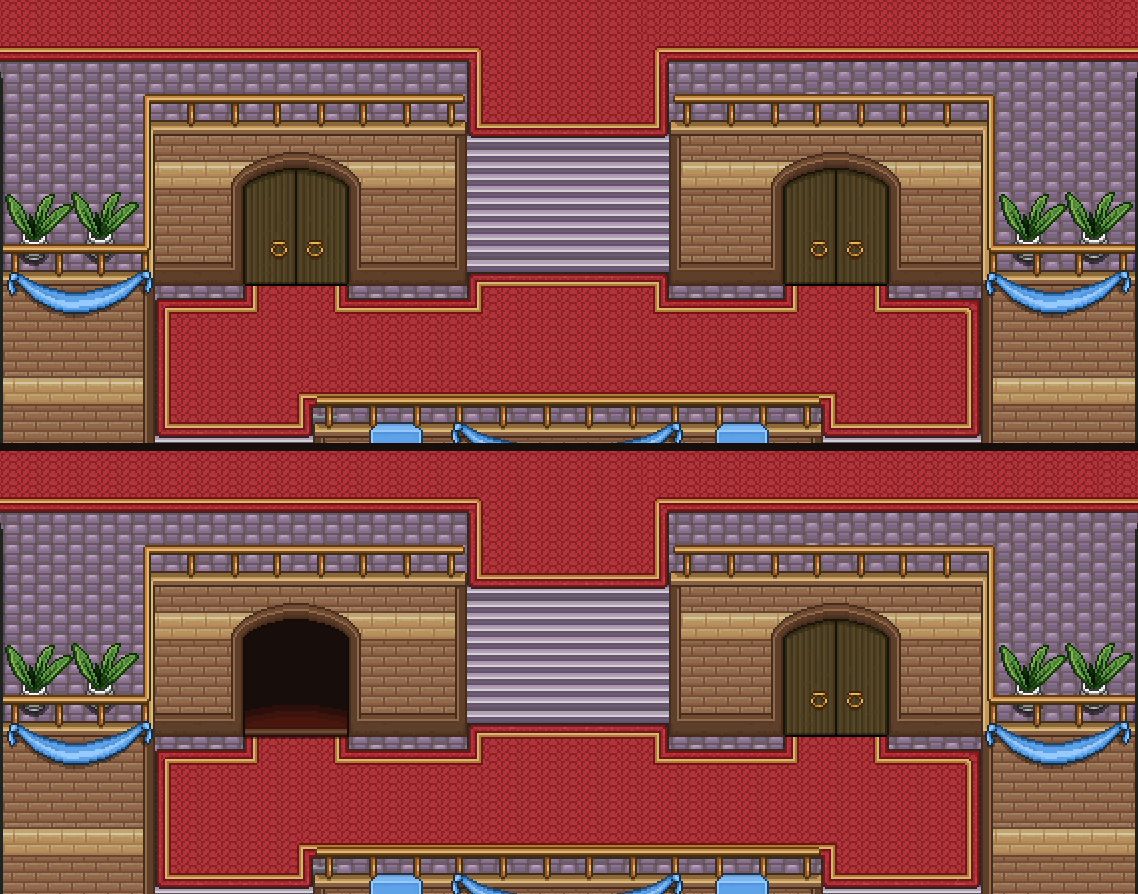
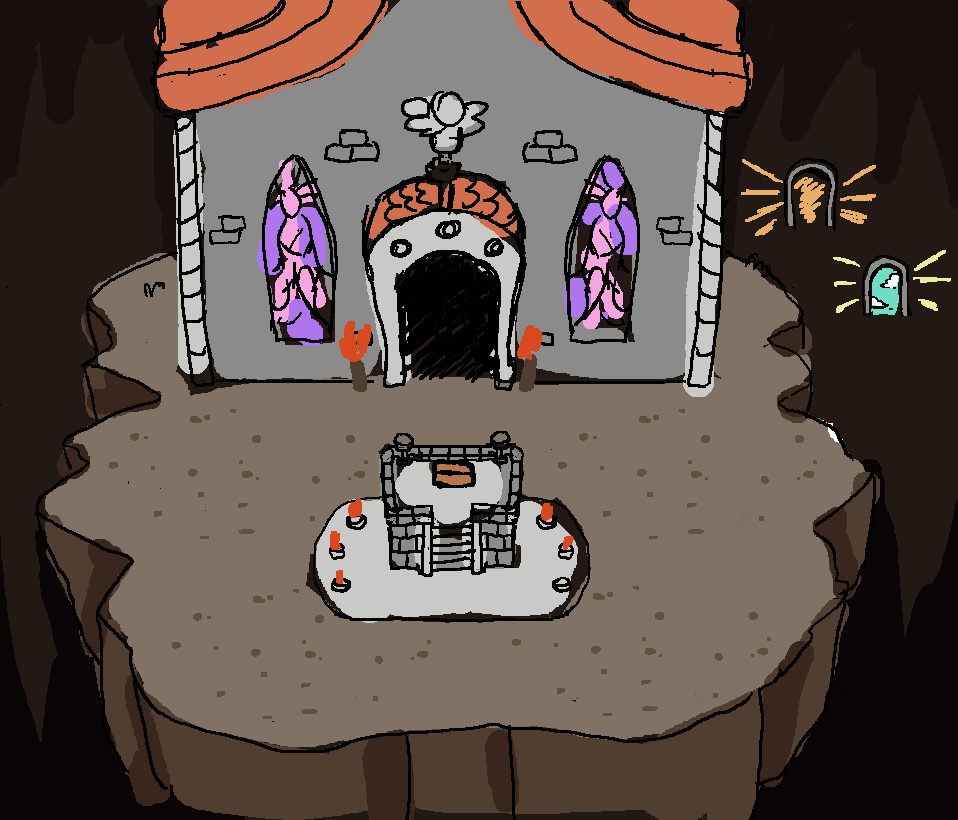
The second idea is a throwback to Bishop’s realm where you’ll be battling him in Story Mode, a grim and dark realm.. In this version, the doors of the temple will open either to an intense glowing light or straight up to the sky, if you should have enough power to get there… :)

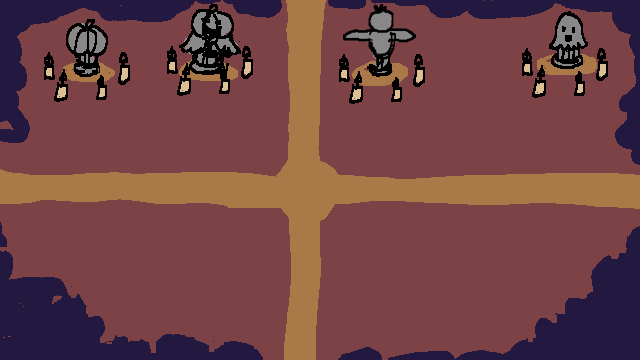
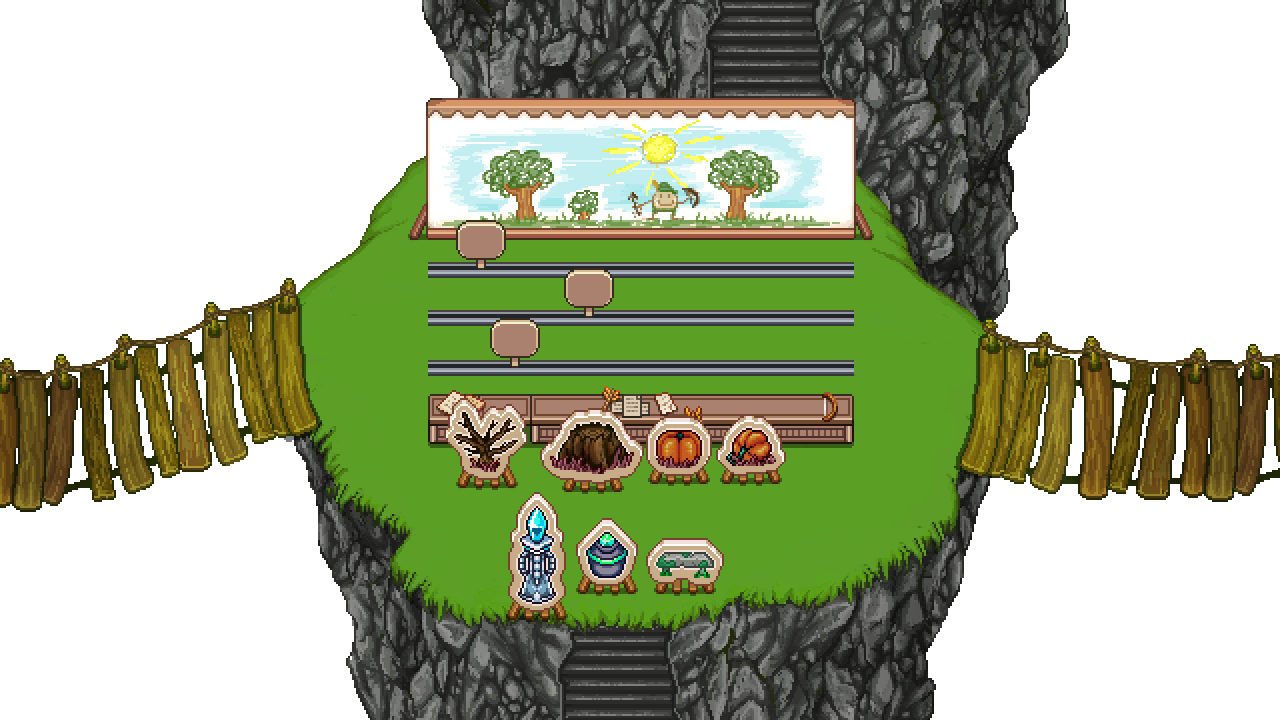
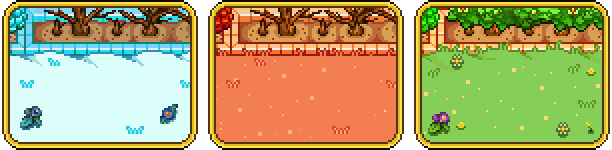
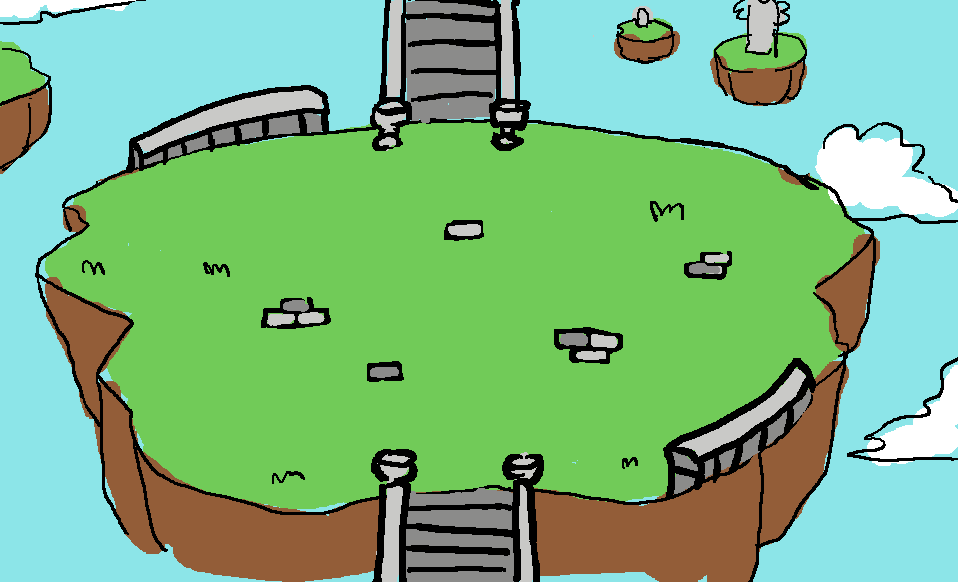
While I was sketching that room, I also went ahead and made some suggestions for the average room design in case we’d end up making regular rooms in that final floor you’ll only get to with the right power level, looking something like this:

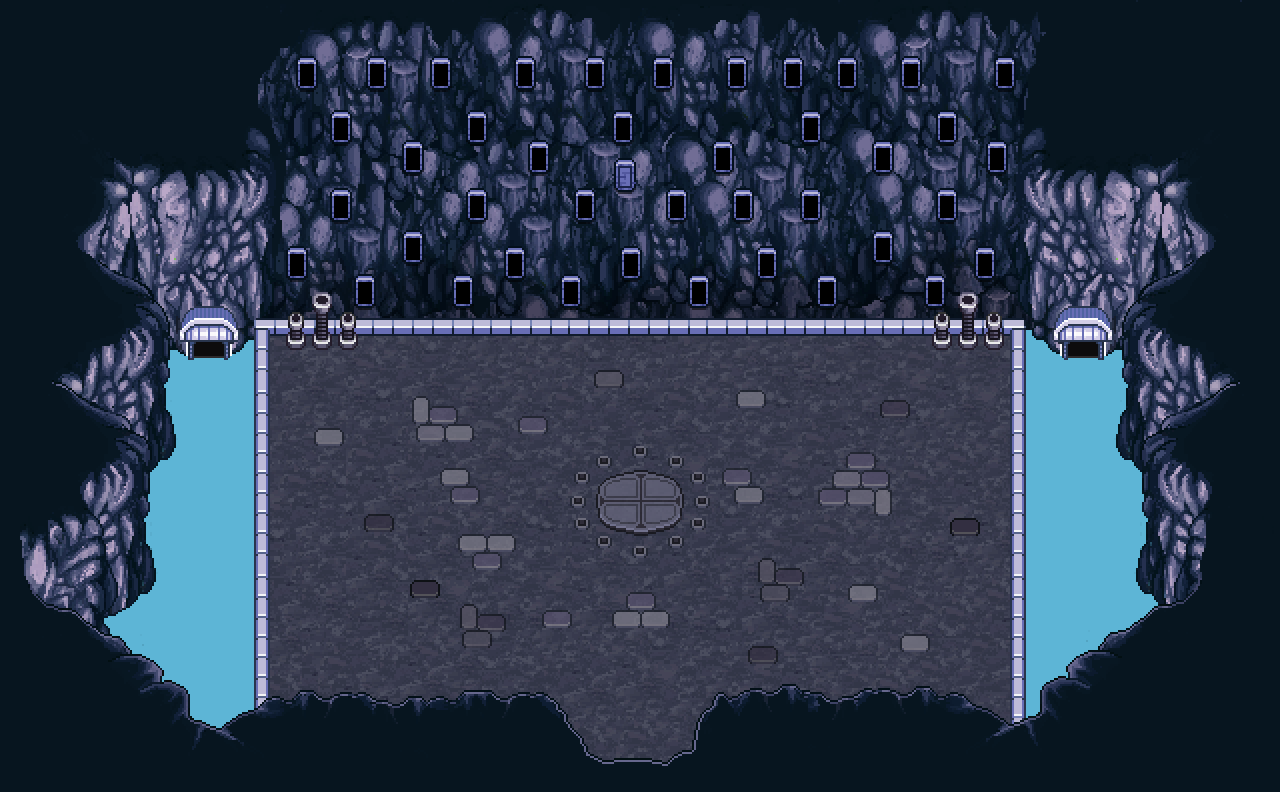
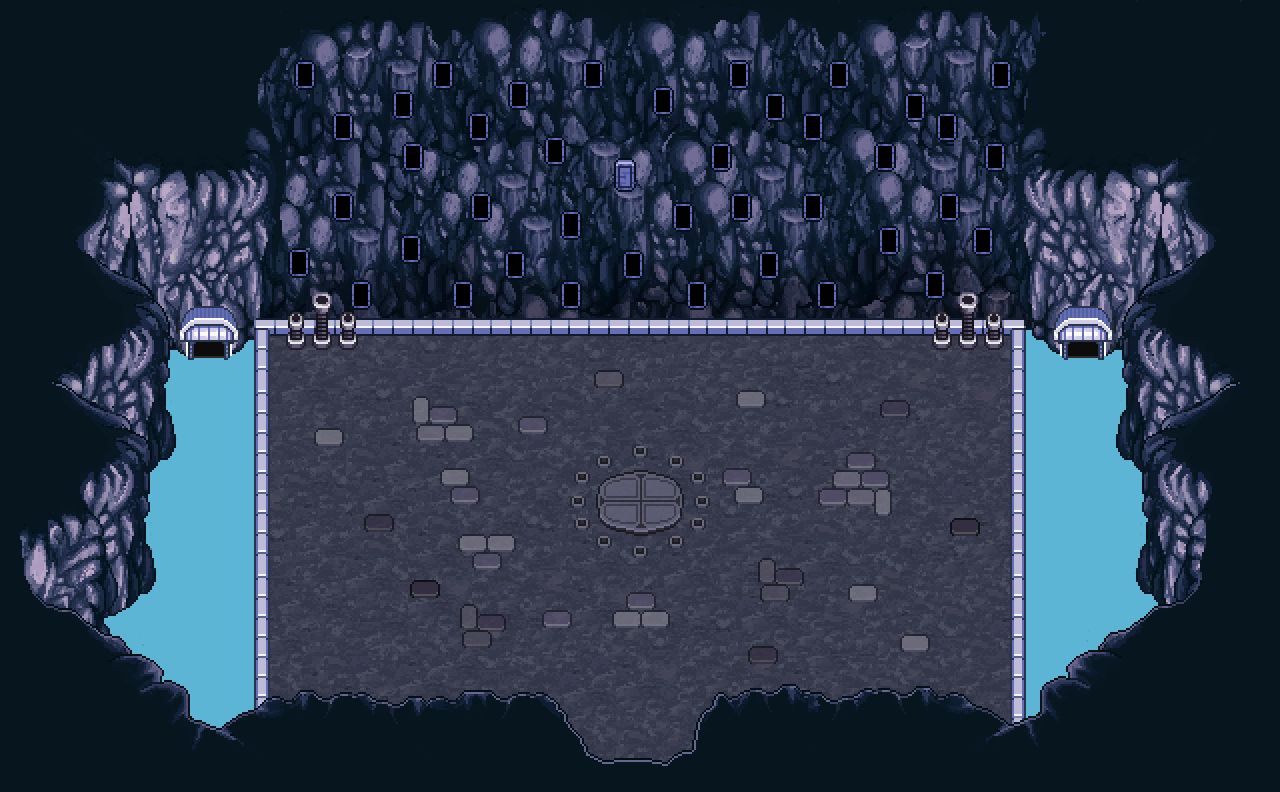
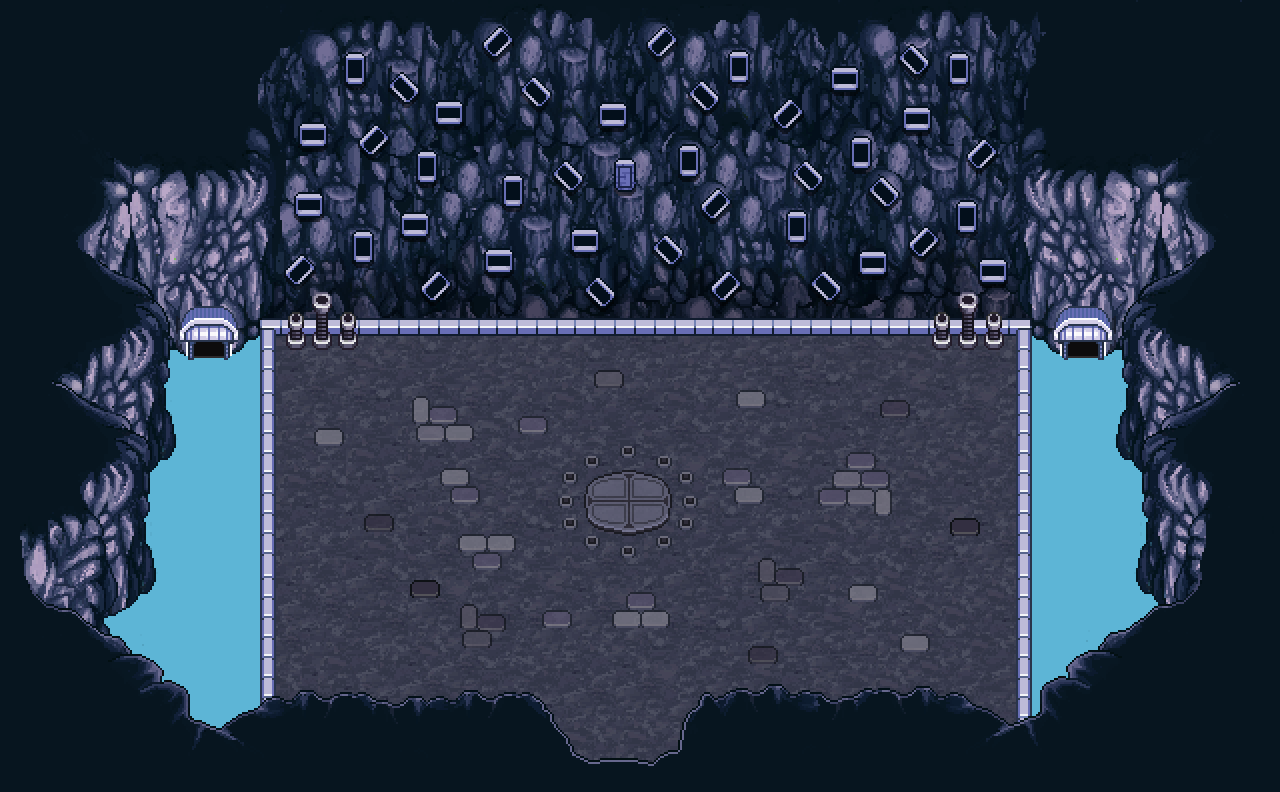
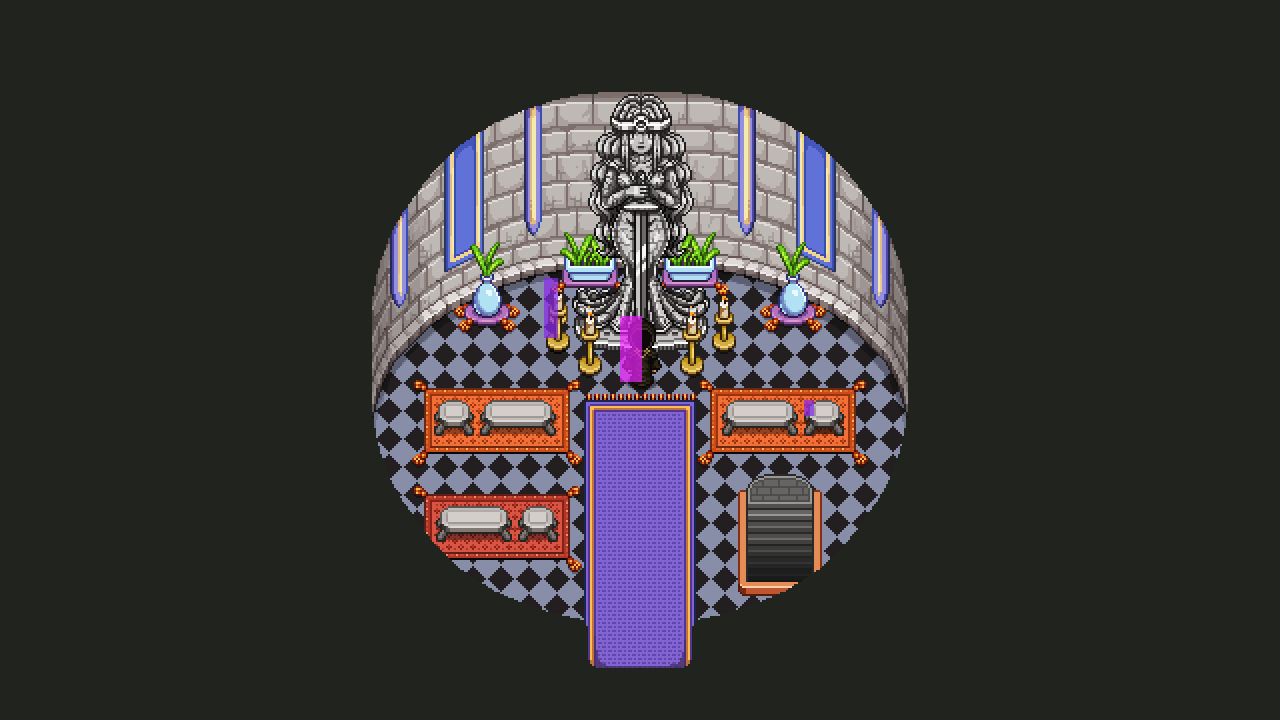
We’ve also been talking a lot about what the final tower dungeon would look like for those that aren’t under the mirror’s influence, so I’ve been playing around with ideas for that as well. Here’s one such suggestion, featuring a lot of mirrors on an otherwise gray tower setting:

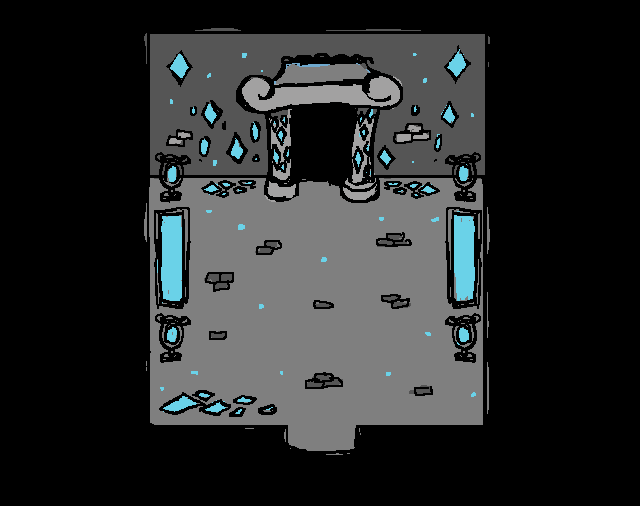
There’s a big possibility we’ll redesign or at least change the colours of the tower exterior now that we have a better idea of what the inside involves, but we’ll figure that out once we’ve completely decided on a design for the interior :)

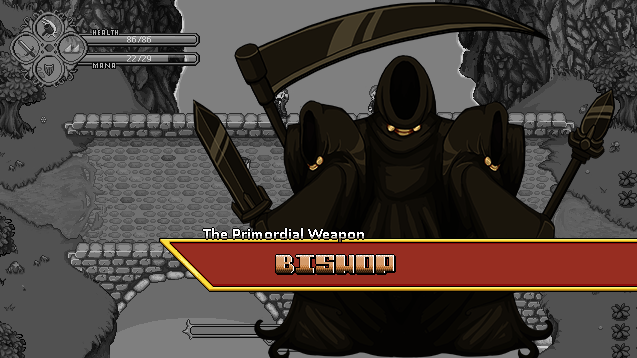
Now, one of the many things Teddy has been working on recently has been adding a bunch of smaller cutscenes and fixes for the various new quests. One such thing is having Bishop appear during the Ghost Ship quest for a short while, and to make his appearance look as good as possible we went through a bunch of iterations. Here you can see our progress, going from pretty crude, to working our way to a more polished version:

Most things we implement go through a bunch of iterations like these, which goes to show implementing the first idea you have just the way you imagine it isn’t always the best bet :)

Meanwhile, Fred has been working on not only Bishop but Grindea herself as well:

The next thing we’ve been discussing and designing for the final dungeon is the Flying Fortress floor. In the beginning we wanted this to be quite phase shift heavy, but as we though more about it we felt the essence of Flying Fortress is more about bullet hells, so we started leaning more towards that. However, we’ve had a ton a random ideas, among others a phase shift puzzle where you need to collect items within a certain time and a bullet hell with guardians that block parts of the room with their laser beams…

In the end however, we settled for three rooms (for now, this might change), first one of those corridor where a number of orbs pass through and you have to run left and right so you pass through the orbs in the slot where one of the orbs is missing – I’m not great at explaining this in words, but you’ve already passed through such a corridor in Flying Fortress already, and this one will be pretty much the same – although we have some ideas for beams and such to make it a bit more difficult and high paced.

The second room will have a number of small platforms, 4 or more, which will get hit by a ton of missiles. The goal in this room is to phase shift to the one platform that won’t get hit by missiles and as such avoid damage. Once the timer runs out you’ll be able to proceed to the final room…

…which is all about bosses, namely Phase man – and not only one, but two of them(!), ending with a little burst of Gun-D4m. We’re pretty excited about this combo and hope you will be too!

For Seasonne, we all felt like the core of the area is the Toy Factory, but we also wanted a little dash of the regular snow area, and an appearance of Marino, since he’s a pretty big character and having Amalet stolen from you after Flying Fortress is a pretty important part of the game, after all.

As such, you’ll begin this floor by appearing in a small Seasonne-esque area with the usual Seasonne enemies minding their own business. At the end of the area is the Toy Factory building, which you enter, and find yourself in a room with a locked door, a blocked path and a chest. In the chest is a key for the locked door, but before you have a chance to unlock it Marino appears and steals it from you, dashing through the blocked path, breaking the things that blocked your path before.

The next room will be one of two challenge rooms, but we haven’t yet decided which one of these it’ll be! In one, you think you’ll have to solve a block puzzle, only for each and every block and piece of it to come alive so you have to defeat it literally by force. The second would be a lot more like the room where you battle a ton of gift boxes, only with more kinds of gift boxes with new abilities!

After that, you’ll end up in a room with a conveyor belt where you’ll chase Marino for a bit before ending up in a room where you’ll battle him along with having to dodge falling bombs and trains, much like in the later rooms of the Toy Factory!

Next, time for some mixed stuff! Your mother’s grave in Startington, some new items made for an additional part of the ghost remembrance quest in the Ghost Ship, as well as an expression for the newly added ghost you’ll find there soon:

And here’s some more new stuff, featuring bigger versions of the catalysts, new backgrounds for the temple of seasons character and enemy codex, a new set of stairs in the Port Monnaie church, and a slight edit of the Startington grave:

Meanwhile, Fred’s been working on more Bishop stuff and some new player animations, one which can be seen here: